The list block allows you to add a bulleted or numbered list to a page.
How to Add the List Block to a Page
There are several ways to add a block to your page. The two easiest ways are as follows:
- Type / to choose a block: In the field where it says those words, type a backslash and a pop-up will display a shortlist of popular blocks. Click on the List block and it will be added to your page. If needed, add a Heading and/or a Paragraph block above the list block to describe the list content.
- Click on the Block Inserter: In the top toolbar, click on the square blue icon with the plus sign. This will open a panel to display all blocks. Select the List block and it will appear in the Content Area in the middle of your page.

When you add a List block it defaults to bulleted list format. The List block opens in the Content Area with your cursor on the first bullet. The List toolbar appears above the list item. Type your first list item and click the keyboard enter key to add the next item.

Choosing a List Type
- To change the list type, click on the List block icon in the toolbar and the toolbar will shorten to see options for both bulleted and numbered lists.

- Click the numbered list icon to switch to a numbered list.
Formatting Options
- It’s possible to format each list item individually. Highlight the text you want to format and click on bold, italics or add a link.
- Typography Formatting: On the right sidebar of the block editor there is a styling option to edit Typography. Please do not use any of the Typography formatting options as the Boise State WordPress Theme manages these styles in accordance with Brand Standards.
Grouping of List Items in Document Overview
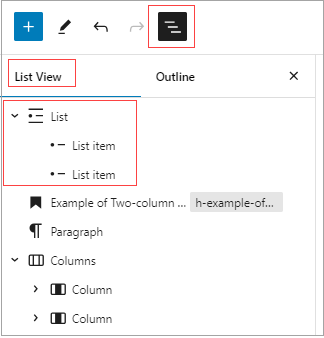
- When you click on Document Overview in the Top toolbar, it defaults to List View. List fields are grouped together in the block and content may look nested, but items are not nested. WordPress organizes the list content into a group. Every bullet or number on the list is listed under the List block. In the following screenshot the List block is at the top of the page and 2 bulleted items appear grouped within it.

- However, the List toolbar does actually provide the ability to nest list content using Indent and Outdent functionality. Please do not use Indent or Outdent functionality as they create real nested lists and nested lists create accessibility issues (screen readers are not able to comprehend the context of the nest list structure). This is a screenshot of the List toolbar that shows you the icons for indent/outdent content that should not be used.

Video: List Block
The following video is a tutorial on how to add lists to your pages using the list block. Closed captions are available and a text transcript is also provided following the video.
Video Transcript: List Block
Lists provide a number of benefits for your content including improved readability, enhanced organization, and better user experience. All lists fall into one of these two categories. They are either unordered or ordered. And to use lists effectively you should keep them concise, use consistent formatting, use them sparingly, and also check them for accessibility. To add lists to your content you will use the list block. And you can either access this block by selecting the toggle block inserter button and selecting list from the available options or by adding a list block to your content or transforming your text to a list. If you already have text on your page you can highlight your content select the paragraph button and transform to a list. By default an unordered list is selected. If you need to change it to an ordered list you would simply select ordered list. To continue to add list items to this list select enter and the list block will automatically be selected and you can type your list items. To exit the list block simply enter twice to access a blank block. Repeat this process as often as needed to structure your content as list items.
Additional Information
Additional information is available for using the List block in WordPress.
