PDF documents are shared for a variety of reasons on the web. However, if they are not created and shared with accessibility in mind, you can introduce barriers for users to access the content.
For this reason, you should always plan to provide content in an accessible way. Oftentimes this means adding content directly to a webpage instead of or in addition to sharing content in a PDF document.
Details for Document Accessibility
Locate Your Documents
After logging in to Acquia Optimize, follow these steps to locate the documents published on your site:
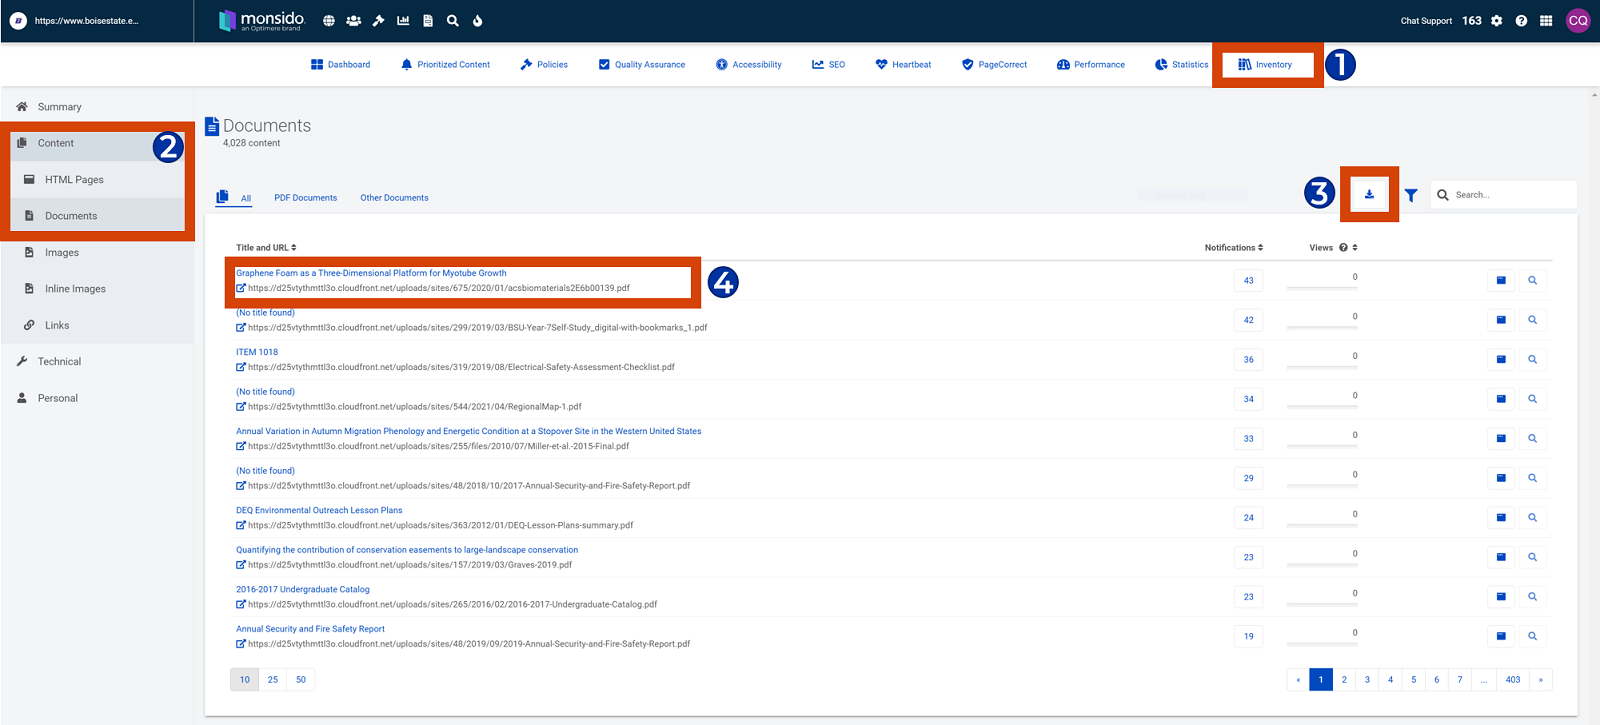
- Navigate to the Inventory Dashboard
- From the Navigation select Content, then Documents
- To download a list of the documents here select the Export button
- To access a page report to view more details about the document, select the Document Title
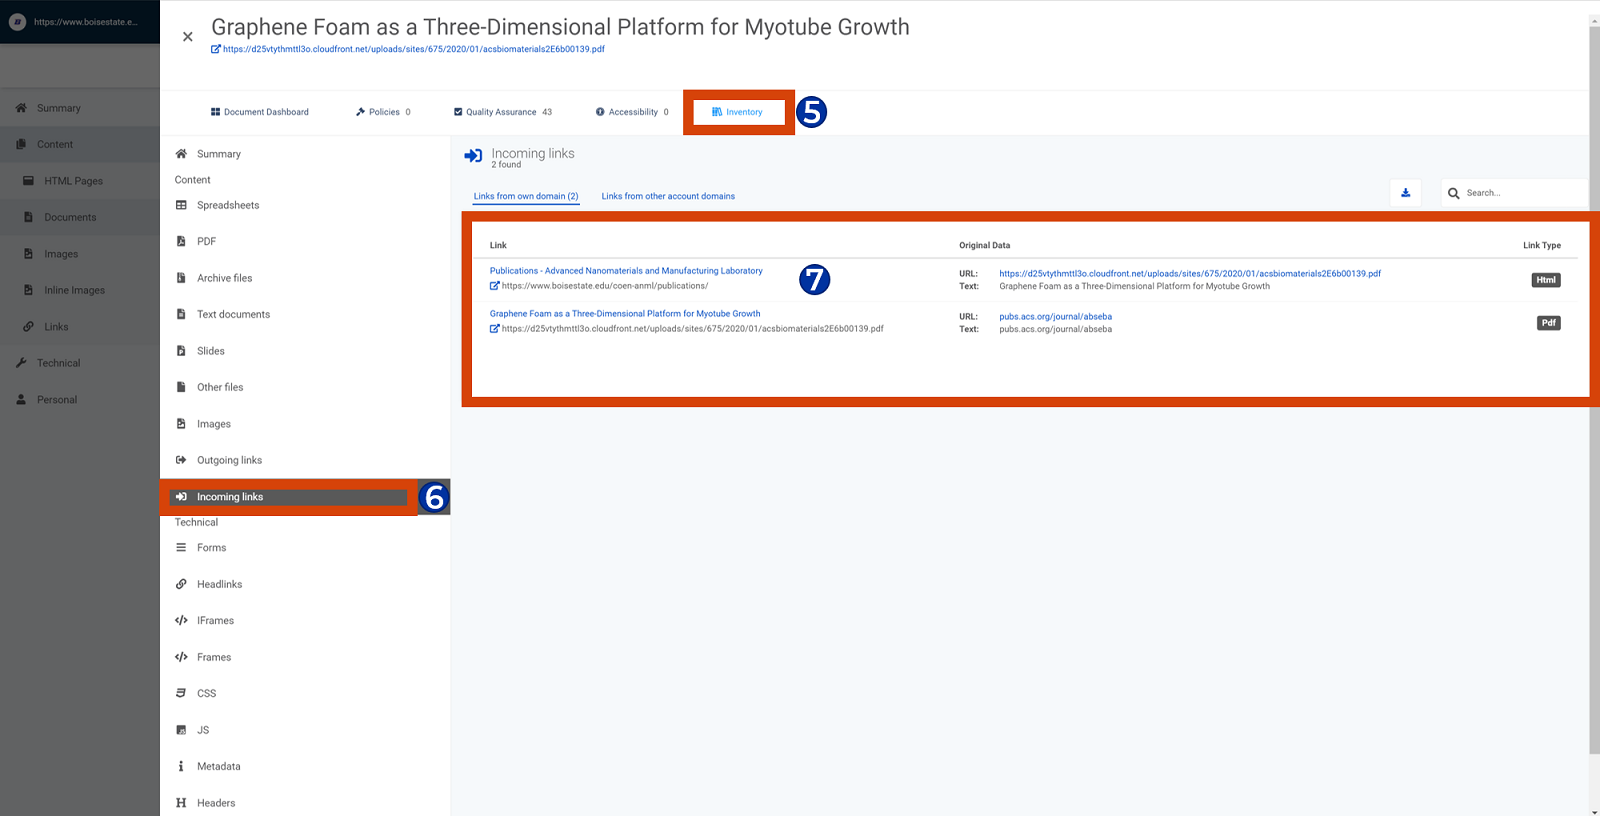
- From the page report, select the Inventory link
- From the available Inventory options, select Incoming Links
- In the Links section, you’ll find a list of the page or pages this document is linked on
Watch Remediate or Replace Inaccessible Documents
Note: As of April 2022, we no longer use Siteimprove to monitor web content. Please refer to Acquia Optimize to locate documents.
Remediate or Replace Inaccessible Documents Video Transcript
Now that you know how to locate documents published on your site, it’s time to review them in either remediate or replace the inaccessible documents. As you begin your review, you want to group your documents into three categories: remove, replace, and remediate.
The remove category is your trash bin.
These documents typically are date related and this is where you place your documents that are no longer needed on your site because they’re old or outdated, have incorrect information or aren’t needed anymore. These documents can be removed from the site without any other intervention.
The replace category is your recycle bin.
The documents in this category may be relevant to your site but need to be replaced with a more accessible format like a web page.
And finally, the remediate category is your fix-it list.
The documents in this category may need to stay published on your site as a downloadable resource but require some attention to meet accessibility requirements.
Using the information exported from Acquia Optimize
Add three additional columns to your spreadsheet for your three categories of remove, replace, and remediate. You can add additional columns as needed for things like notes or even names of who is responsible for a particular document. If you are collaborating with more than one person on your review you may consider using a Google Sheet for easier collaboration.
Now you’re all set to begin your review! As you review your documents you may want to visit Webguide for additional resources, tips and tricks, and support for creating accessible documents.
If you have any questions as you are inventorying documents, get in touch with the OIT Web Accessibility team at OITaccessibility@BoiseState.edu or visit us online and boisestate.edu/webguide.
Watch Plan for Future Document Accessibility
Plan for Future Document Accessibility Video Transcript
For this document challenge we explore creating a plan for future document accessibility.
One of the benefits of creating documents is they are easier to share and collaborate with others than a webpage. They are also easier to draft, revise, and share quickly in a digital format.
We know that documents, even accessible ones, can make the user experience more challenging on the web. However, after taking the time to create a lengthy document, it may seem daunting to then translate everything into an accessible web page.
The great news is the features that make a document accessible are almost identical to those of an accessible webpage. So if you can create an accessible document, you can create an accessible webpage!
Here are 10 tips for creating accessible documents
1. Plan ahead for accessibility
Before you begin a project, make sure you have enough time to review accessibility as you go. Use tools like the built-in accessibility checkers in Microsoft Word or Google Docs to check your documents for any errors and address them right away.
2. Outline document headings using built-in styles
Take the time to create an outline of your document with headings using your Word Processors built-in styles. These styles not only add visual appeal to your document, they also add the necessary tags screen reader users need to more easily read and interact with your document. Outlining your content ahead of time ensures your content is easy to navigate and make accessible both in the document and in a future webpage.
3. Use accessible colors
If you are using color, make sure there is enough contrast between the foreground and background so text is easy to read in a digital version. You can find information about Boise State’s official colors on the Brand Standards site or use a color contrast analyzer like the one available from the Paciello Group.
4. Add text alternatives for images, tables, and media
Just like on a webpage, you must include text alternatives for things like images, tables, and media. This ensures users who can’t see the content can still access it in a way that works for them.
5. Add accessibility statement to document
An accessibility statement provides users with contact information should they encounter any issues with the document. This can be added on the first page or in the footer of the document. For example: “If you need this document in an alternate format for accessibility purposes, please contact [person’s name or department] at [email and phone number].
6. Save as PDF
Once you’ve verified the document is accessible using the built-in accessibility checkers, you can save as a PDF. This format is preferred for sharing online since it opens in a more predictable way across different devices and preserves the formatting more effectively than other formats.
7. Verify reading order
Your PDF document should be mostly accessible at this point, but there is one last thing you should always verify and that’s the reading order. The reading order is the order in which the document is read electronically with a screen reader. For example, an accessibility statement may be located in a footer, but users would benefit from hearing read out first. You can adjust the order so the statement is read right before or after the document title. If your document is more complex or contains images, you will likely need to do a more thorough review than if it is just text. Remember to save as you go!
8. Copy and paste as plain text
Once you have an accessible document, creating an accessible webpage is as easy as copy and paste! You can paste your content as plain text to remove any extra styling that might be hiding behind the scenes. Now you can style your content using the tools available in WordPress.
9. Make document links clear
Since you’ve verified your document is accessible, you can now add it to your webpage as an optional downloadable resource for your audience. Make sure your link text clearly identifies the resource as a document so users can quickly understand what they are opening.
10. Verify accessibility of web page
Before you publish your webpage, take a few minutes to review your work for any accessibility errors. A great tool for this is the WAVE browser extension. You can quickly see if you have any errors, view the outline of your content, and see alternative text for images.
There you have it!
A plan for taking your content from a draft in a document to an accessible web page and an accessible downloadable resource. If you have any questions or concerns as you are working on documents or your webpages, feel free to reach out to the OIT Accessibility team at OITAccessibility@boisestate.edu or find us online at boisestate.edu/webguide.
Need some extra support for this challenge? We’re here to help!
Visit the Drop-In Lab
The WordPress and Web Accessibility Teams are available during the drop-in labs. You can stop by to ask questions or use this as dedicated time on your calendar to review images. View the Webguide Events Calendar for upcoming drop-in labs dates and times.
Review Document Requirements and Best Practices on Webguide
Webguide has several resources for you to review regarding accessible documents.
Troubleshoot Common PDF Issues
For assistance resolving errors in your PDF documents, visit Troubleshooting Common PDF Accessibility Issues for a list of video tutorials with step-by-step directions on a range of issues.
Web Content Accessibility Micro-Certification Course
Take your accessibility game to the next level with a Web Content Accessibility Micro-Certification Badge! You’ll learn more about web accessibility best practices and access resources available at Boise State to support an accessible web presence. Demonstrate your skills and earn one or more badges with this free professional development opportunity. As a bonus, the work you complete on this challenge will count as work towards the badges!
One-on-one consultation with OIT Web Accessibility Team
If you have specific questions about content on your site, you can schedule a one-on-one consultation with the OIT Web Accessibility Team. To set up a consultation, contact us at OITAccessibility@boisestate.edu.


