The Image block is used to add an image to your page or post.
There are several ways to add a block to your page. The two easiest ways are as follows:
- Type / to choose a block: In the field where it says those words, type a backslash and the word “image”. A pop-up will display the Image block and a few other blocks. Click on the image block and it will be added to the Content Area in the middle of your page.

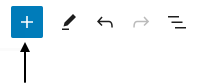
- Click on the Block Inserter: In the top toolbar, click on the square blue icon with the plus sign. This will open a panel to display all blocks. Select the Image block and it will appear in the Content Area in the middle of your page.
When you add the Image block to the Content Area of the Block Editor, it looks like this:
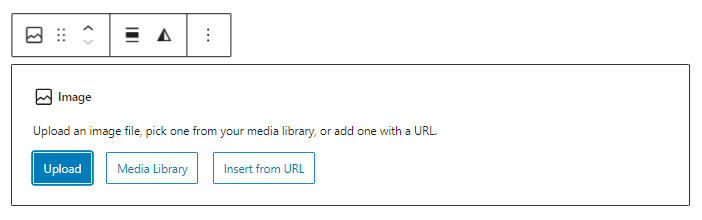
Image Alignment
To display an image to the left or right of your text, with text wrapping around the image, follow these steps:
- If needed, add a Header 2 to the area on your page above the image.
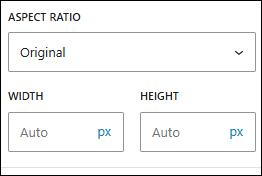
- Add the image to the page. The image defaults to “no alignment” so it looks like it’s centered. That’s ok. Note: you can resize the image if it looks too big by clicking on the image and in the right sidebar, the “block” tab will be selected. Here you will see a set of fields for “Aspect Ratio”. You can modify the Width field – try starting at 250px and go from there to find the appropriate size.
- If needed, add a header H2 or H3 and a paragraph block of text to the editor.
- Go back to your image and in the image toolbar click on the “Align” icon and select, Align Left or Align Right. The image will move left or right of the text. It may appear very far left or very far right in the block editor, but when you preview the page everything will look appropriately aligned.
Read more about guidelines for handling and adding images and media to your page in Webguide on the Images and Media page.
Additional Information
The WordPress website provides additional information about using the Media block in the WordPress application.