Steps to Submit an Absence for a Direct Report
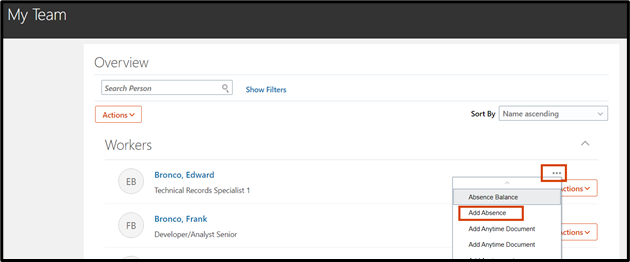
Step 1: Locate Employee and Select Add Absence
In the Workers Section of the My Team area, locate the applicable employee. Select the ellipses next to their name. Select Add Absence from the drop-down.
Step 2: Select Absence Type
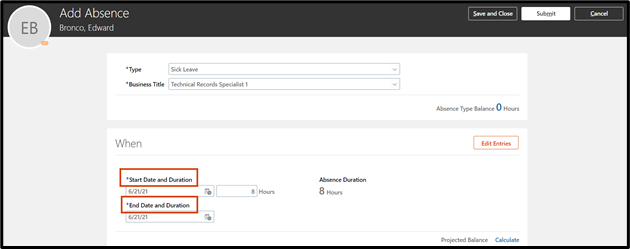
Select the applicable absence Type from the dropdown menu. Additional fields will populate.

Step 3: Enter Absence Dates and Hours
Enter the Start Date and Duration and End Date and Duration and the Hours per day for the absence.
The Absence Duration total will auto-populate as well.
Pro Tip!
To change the Hours per day for a specific date, select the Edit Entries button.

Then select Edit (pencil icon) next to the applicable date you want to update.

Make the applicable changes, then select OK.

Step 4: Enter Comments and Attachments
In the Comments and Attachments section, add any applicable comments and attachments to the transaction.
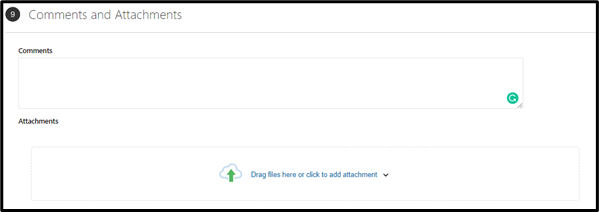
Please check with your department’s business manager for any required comments or attachments.
Step 5: Submit Absence
Select the Submit button to submit absence.

What’s next?
The employee will NOT receive a notification that an absence has been created on their behalf. The employee is only notified when the absence is approved. Line managers are responsible for approving absence requests.
Approved absences will transfer to Payroll for processing during the applicable pay period when the absence(s) will occur; employees do not need to enter the approved absence hours on their time card as the hours will automatically fill in.
- Note: Professional/salary employees reporting absences through the absence module will not have a time card generated in Team Time Cards. In these instances, the approved absences are transferred to Payroll without a time card.
Steps to Update or Withdraw an Absence for a Direct Report
Step 1: Locate Employee and Select Existing Absences
In the Workers Section of the My Team area, locate the applicable employee. Select Actions next to the employee name and select Existing Absence from the drop-down.
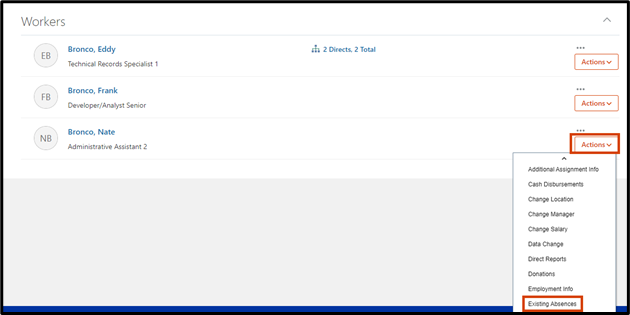
- To update an existing absence for an employee, proceed to Step 2.
- To withdraw an existing absence for an employee, skip to Step 3.
Step 2: Update and Existing Absence
To update an existing absence request for an employee, locate the appropriate absence dates and select the Edit button (pencil icon).

From the When screen, click the Edit button (pencil icon) for any listed date to edit that entry. Select the Add button if you need to add additional absence dates/times.
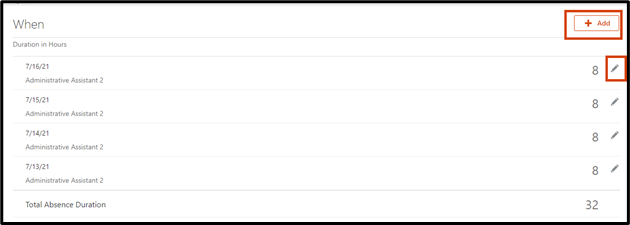
After making the applicable changes, select the Submit button.

Step 3: Withdraw an Existing Absence
To withdraw an existing absence for an employee, locate the absence to update. Then select the Edit button (pencil icon) next to the applicable date you want to withdraw.

Select the Delete button. Note: You can delete single (daily) entries or all entries at once.

What’s next?
The employee will receive a notification that their absence has been updated or withdrawn as applicable.
Line managers are responsible for approving submitted absence requests.
Approved absences will transfer to Payroll for processing during the applicable pay period when the absence(s) will occur; employees do not need to enter the approved absence hours on their time card as the hours will automatically fill in.
- Note: Professional/salary employees reporting absences through the absence module will not have a time card generated in Team Time Cards. In these instances, the approved absences are transferred to Payroll without a time card.
Steps to View Existing Absences for an Employee
Step 1: Locate Employee and Select Existing Absences
In the Workers section, locate the applicable employee and select the ellipses next to the employee name. Select Existing Absence from the drop-down.
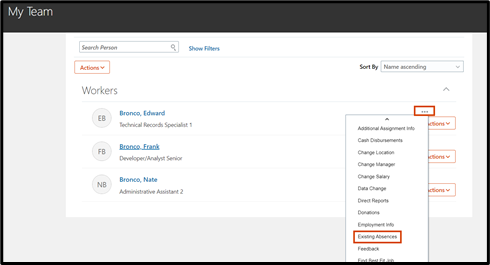
Step 2: View Existing Absences
If the employee has existing absences, they will appear for you to view. The view will default to the Last 6 months.
ProTip!
You can search for specific absences by either changing the Last 6 months to a specific time period, searching by type of absence or status, or sorting by date.

What’s next?
To create an absence for an employee, check out the Submit and Absence for a Direct Report job aid or to update an absence for an employee, check out the Update or Withdraw an Absence for an Employee job aid.
Steps to View My Team Schedule
Step 1: Access Quick Actions
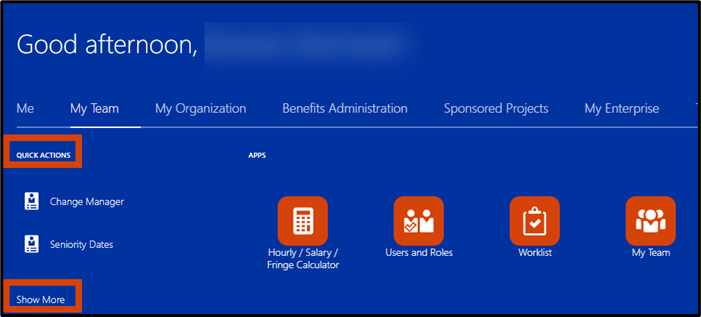
Under Quick Actions in the My Team area, scroll down and select Show More.
Step 2: Access Team Schedules
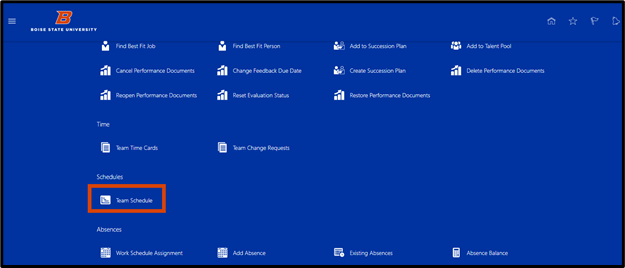
Under the Schedules header, select Team Schedules.
Step 3: View Team Schedule Absences
The absence calendar displays in a weekly view.
ProTip!
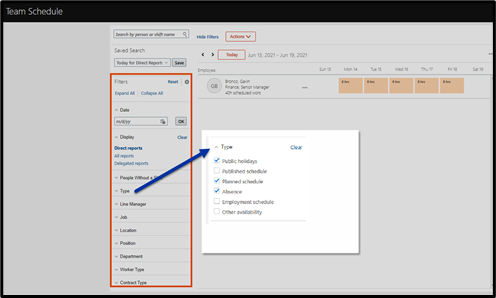
Use the calendar filters to change the information displayed on the calendar. Select Show Filters to update the Type of information to display (eg absence and employee work schedule). Modify the date to jump to a specific weekly view.

Select the expand button (chevron icon) to the left of filter options to expand and modify filters as needed (eg modify the type filter to display Absences and Employee Schedule).
Step 4 (optional): Save Team Schedules Filter View
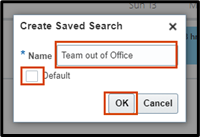
Save your preferred filter setting(s) by selecting Save and assigning a name to the saved search.

Select the Default checkbox to have the calendar automatically display this selection when you access Team Schedule in the future.
Need help with your absences?
If you have additional questions about the process, contact the Human Resource Payroll team at payroll@boisestate.edu
If you need assistance with the process outlined above, submit a ticket using the OCI Service Request link.