Disclaimer – Bronco Hub Job aids are currently transitioning to accessible WordPress pages. All current job aids are still available through Jobs Aids and Resources.
Who is this job aid for?
This job aid is for employees who need to:
- Change an Employee’s Line Manager (Supervisor)
Jump to Change an Employee’s Line Manager Section - Change an Employee’s Physical Work Location
Jump to Change an Employee’s Physical Work Location Section - Change an Employee’s Salary
Jump to Change an Employee’s Salary Section
Steps to Change an Employee’s Line Manager (Supervisor)
While changing the line manager, you can also assign the employee direct reports or make changes to an employee’s existing direct reports, if applicable.
Important Note
The change manager actions will auto-approve once submitted. Action initiators are able to assign any active Boise State employee as a line manager. Always confirm you have added the correct line manager (and direct reports, if applicable) prior to submitting the action in Bronco Hub.
Step 1: Access Bronco Hub My Team or My Organization
Access Bronco Hub through your myBoiseState Employee View. In the Services section, locate the link for Bronco Hub.
After accessing Bronco Hub, you can either use the My Team or My Organization tabs to complete the process.
My Team
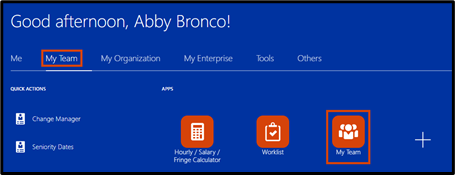
To locate a direct report, access the My Team tab and then select the My Team link.
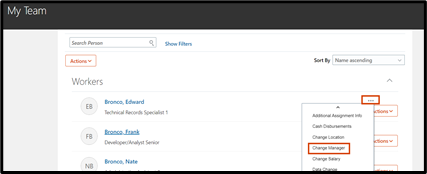
Locate the employee in the Workers section of the page. Select Actions to the right of the employee name and select Change Manager from the drop-down list.
My Organization
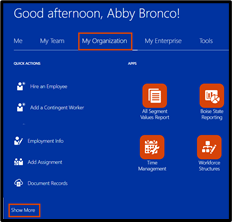
To change the line manager of an employee who is not your direct report, access the My Organization tab and select the Show More link from the Quick Actions menu.
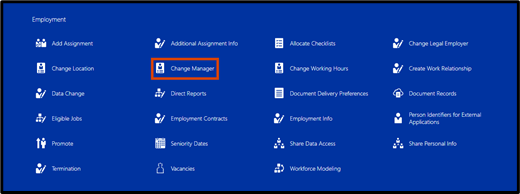
From the Employment section, select Change Manager.
Use the search bar to locate the employee. Search by Employee name, Employee Email or Employee ID. Select the appropriate employee name from the drop-down.

Step 2 (optional): Select Information to be Managed
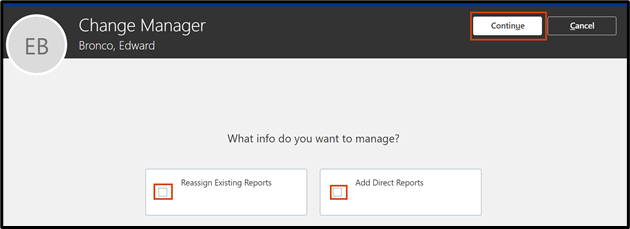
To reassign any existing direct reports to a different line manager, select the Reassign Existing Reports tile.
- Important Note: If the individual does not have existing direct reports, you will not see the Reassign Existing Reports tile.
To add new direct reports, select the Add Direct Reports tile.
If you are not assigning the individual direct reports, do not select the Add Direct Reports tile.
Select Continue.
Step 3: Enter When and Why Details
In the When and Why section, enter the following information:
- When does the manager change start? Enter the start date for the manager change
- What’s the way to change the manager? Select Manager Change
- Why are you changing the manager? Select Manager Change
- Why are you making changes to direct reports? Leave blank
Select Continue.

Step 4: Add New Manager
In the Maintain Managers section, the manager field defaults to the current line manager. If the manager will not change with the new assignment, select Continue.
Select the Add button to add a new line manager for the concurrent assignment OR select the Edit button (pencil icon) to edit the line manager for the concurrent assignment.
In the name search field, begin typing the individual’s first or last name and select them from the drop-down list.
Select Line manager in the Type field.
Select OK then select Continue.

Step 5 (Optional): Reassign Existing Reports
If you selected the Reassign Existing Reports tile in step 4, select the Select All box to reassign all existing direct reports to a new line manager or if you are only reassigning some direct reports, click the box next to the individual or individuals you want to reassign.

Then in the Search for proposed manager field, begin typing the first and last name of the new line manager and select their name from the drop-down list.
Select Continue.
Step 6 (Optional): Add Direct Reports
If you selected the Add Direct Reports tile in step 4, an Add Direct Reports section will display.
Direct reports can be added by searching for the individuals to add by typing their first or last name. Select the individual from the drop-down list. The Reporting Relationship will default to Line manager.
Select Continue.

Step 7: Add Comments and Attachments
In the Comments and Attachments section, add any applicable comments and attachments to the transaction.
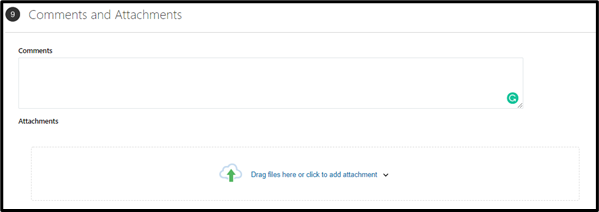
Please check with your department’s business manager for any required comments or attachments.
Step 8: Submit
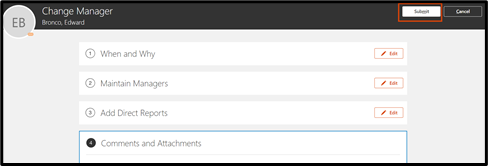
Select the Submit button at the top of the page.
What’s next?
This action will auto-approve once submitted and you will receive an email notification confirming the update. The employee will not receive a system notification.
Steps to Change an Employee’s Physical Work Location
Important Notes
In order to change an employee’s work location you must either be their manager OR you must have the appropriate security access to complete manager self service actions for the HR department ID of the employee(s) you’re attempting to update. To request access to change employee locations, your supervisor must submit an OCI Service Request ticket.
If the employee work phone number needs updated, this must be completed via the Boise State Change Request Form (outside of HCM)
Step 1: Access Bronco Hub My Team or My Organization
Access Bronco Hub through your myBoiseState Employee View. In the Services section, locate the link for Bronco Hub.
After accessing Bronco Hub, you can either use the My Team or My Organization tabs to complete the process.
My Team
To locate a direct report, access the My Team tab and then select the My Team link.

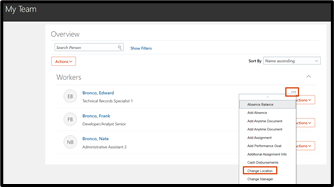
Locate the employee in the Workers section of the page. Select Actions to the right of the employee name and select Change Location from the drop-down list.
My Organization
To promote an employee that is not your direct report, access the My Organization tab and select the Show More link from the Quick Actions menu.

From the Employment section, select Change Location.

Use the search bar to locate the employee. Search by Employee name, Employee Email or Employee ID. Select the appropriate employee name from the drop-down.
Step 2: Enter When and Why Details
In the When and Why section, enter the following information:
- When does the location change start? Enter the change effective date
- What’s the best way to change the location? Select Location Change
- Why are you changing the location? Select Location Change
Select Continue.
Step 3: Enter Location Details
Only update the Location field of the Location section. Leave all other fields blank.
- Location: Enter the employee’s new department 4-digit mail stop and select the department from the drop-down list. This field will populate with the applicable location name. Refer to the Mail Stop Codes By Number resource to confirm mail stop accuracy.
Select Submit.
What’s next?
This action will auto-approve once submitted. Location changes will be reflected in the Boise State Searchable Directory within 24 hours.
Steps to Change an Employee’s Salary
Before you begin
For all employees besides students and adjuncts, you must submit Compensation and Classification Form prior to submitting in Bronco Hub to obtain approval for the salary change.
For students, please review student classifications and pay grades.
When changing an employee’s salary, you will need to calculate their hourly rate using the Hourly/Salary/Fringe Calculator provided by Human Resources.
Salary changes must have an effective date of the beginning of a pay period (Sunday). If a salary change is submitted with a mid pay period effective date, it will be rejected by HR. The final approval for the submitted action must be completed by the Thursday before payday in order for HR to process the request by the effective date.
Submitted salary changes cannot be edited. If a salary change is submitted incorrectly, you will need to withdraw and resubmit a new one.
Step 1: Access Bronco Hub My Team or My Organization
Access Bronco Hub through your myBoiseState Employee View. In the Services section, locate the link for Bronco Hub.
After accessing Bronco Hub, you can either use the My Team or My Organization tabs to complete the process.
My Team
To locate a direct report, access the My Team tab and then select the My Team link.

Locate the employee in the Workers section of the page. Select Actions to the right of the employee name and select Change Salary from the drop-down list.
My Organization
To promote an employee that is not your direct report, access the My Organization tab and select the Show More link from the Quick Actions menu.

From the Compensation section, select Change Salary.
Use the search bar to locate the employee. Search by Employee name, Employee Email or Employee ID. Select the appropriate employee name from the drop-down.

Step 2: Enter Salary Change Information
In the When and Why section, enter the following information:
- When does the salary change start? Enter the effective date of the salary change. Salary changes must have an effective date of the beginning of a pay period (Sunday). Check out the current Payroll Schedule for pay period dates.
- What’s the action name? Change Salary
- Why are you changing the salary..? Select the action reason that was included in the Compensation and Classification approval email.
Then select Continue.
Step 3: Enter Salary Information
In the Salary section, enter the Salary Basis and the Hourly Rate. The adjustment amount and adjustment percentage fields will update according to the information entered in the fields.
- Salary Basis: Select the applicable option from Hourly, Pay Per Unit, Prorated Hourly, Prorated Salary, or Salaried.
- Hourly Rate: Input the calculated hourly rate for the employee. Please note, it must fall within the salary range shown on the page which is based on the pay grade and job. Use the Hourly / Salary / Fringe Calculator to help calculate the rate.
Select Continue.
Step 4: Enter Comments and Attachments
In the Comments and Attachments section, add any applicable comments and attachments to the transaction. Attach the approved Compensation & Classification form.

Important Note
If you are making funding source changes along with a salary change, add details about the funding source change in the comments section.
Please check with your department’s business manager for any required comments or attachments.
Step 5: Review Salary Change Details and Submit Request
Select the Edit button (pencil icon) on any section to expand the section and view details.
After reviewing and verifying any salary change details entered, select the Submit button at the top of the page.
What’s next?
Once submitted, the salary change request will route to the following:
- The line manager (supervisor) of the employee being transacted upon.
- The funding source manager(s) for the employee assignment home department/HR Department. Example, employee has a job in Athletics, the home department of the employee assignment is 97400
- Human Resources
- Graduated college if the transaction includes job codes: 49121, 49120, 49112, 49110, 49111, 49181, 49180
- College / Division is the last approval
- Provost if the person being transacted upon is faculty
If other individuals need to be included in the approval workflow (e.g. Principal Investigator for grant funded transactions) the funding source manager must add the PI approver as an AdHoc action.
Important Note
If the employee being transacted upon is not a faculty member, the name of the initiator will display as the last approver in the approval workflow. The initiator does not need to approve the transaction, Bronco Hub will automatically approve after all other approvals have been completed.
Submitted salary changes cannot be edited. If a salary change is submitted incorrectly, you will need to withdraw and resubmit a new one.
What options are there to follow up on the action after it’s submitted?
The action initiator (submitter) can follow up on (e.g. view approval information) the submitted action by locating it in the initiated tasks section of the Worklist.
Need help employee changes?
For questions about the process of changing managers or direct reports, contact the Human Resource Processor team at hrprocessor@boisestate.edu
For assistance with the Bronco Hub, submit a ticket using the OCI Service Request link.